

How To Set Dpi On Logitech G502
Configure G502 arrow settings with Logitech Gaming Software
At that place are no Downloads for this Product
There are no FAQs for this Product
There are no Spare Parts available for this Production
The G502 gaming mouse lets you lot customize arrow settings in two different modes:
- Automated Game Detection mode
- On-Lath Memory fashion
NOTE: For help with choosing between these ii modes, see answer 360023420373.
Automatic Game Detection mode
The G502 gaming mouse supports these pointer customizations in Automatic Game Detection mode:
- DPI levels - Configure upward to 5 levels, from 200-12000 in fifty DPI increments.
- Report rate - Update from 125/sec (8ms response time) to thou/sec (1ms response time).
- Per profile pointer settings - Enable different pointer beliefs for each contour.
- Acceleration - Heighten arrow precision.
To configure your pointer settings:
-
Open up the Logitech Gaming Software:
First > All Programs > Logitech > Logitech Gaming Software 8.x
-
Click the glowing pointer - gear icon. Make sure the blue marker next to the icon is to the right.
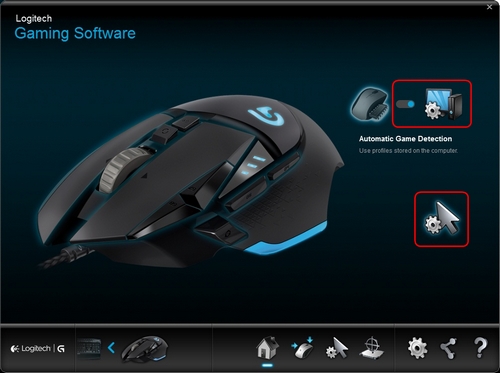
The Pointer Settings window will appear.
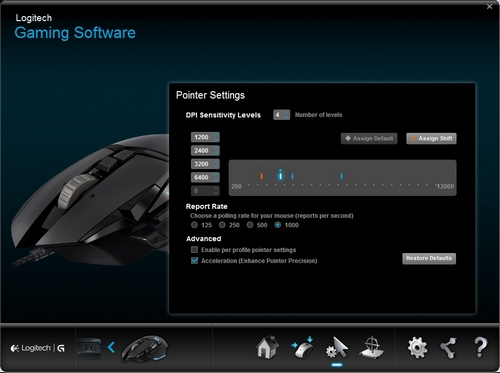
-
Under DPI Sensitivity Levels, drag the tick marker along the graph. For each DPI level you fix, you'll see a tick marking. Yous can set to five.
NOTE: If you prefer, you tin edit the list of DPI values to the left of the graph from 200-12000. For each DPI level y'all fix, y'all'll come across a tick mark rounded to the nearest 50. For instance, if you blazon in "632", the software will round to 650 DPI.
-
Assign Default - (Required) One DPI level must always be the default. To change the default, click a DPI level that doesn't have a blueish diamond above it, and then click Assign Default. This is the DPI level the mouse volition return to when you:
- Press the default DPI button
- Switch between profiles
- Ability up the reckoner
- Wake the computer from sleep mode
-
Assign Shift - (Optional) A Shift DPI is a DPI level you can temporarily activate by pressing the DPI Shift button. To set the Shift DPI, select a DPI level that isn't highlighted in orangish, and and so click Assign Shift. This enables extreme precision or mouse speed when needed. The mouse volition revert back to the current DPI level when the push is released.
TIP: Buttons yous assign as DPI Up, DPI Down and DPI Cycle volition enable you to modify between DPI levels chop-chop.
NOTE: LEDs on the G502 mouse will change while cycling through DPI levels using assigned mouse buttons..
-
-
Alter the Report Rate, if you prefer something other than the default of yard reports/second (1ms response time). The Study Rate controls how often your mouse updates its position to the computer.
Annotation: The possible range is from 125/sec (8ms response time) to thou/sec (1ms response time).
You can:
- Decrease processor employ by reducing the report rate.
- Increment the mouse response by raising the written report rate.
TIP: For virtually PCs, a report rate of 500 is recommended.
-
Make your preferred selections under Advanced. The options are:
-
Enable per profile arrow settings - Select this option to enable each profile to accept different pointer behavior (come across answer 360023420373 for help).
TIP: We recommend leaving this unchecked for the initial setup.
-
Dispatch (Enhance Pointer Precision) - Select this option to use Window's "Enhance Pointer Precision" dispatch.
TIP: For gaming accuracy, we recommend leaving this unchecked, but y'all can enable it if y'all prefer the feel of default Windows acceleration.
-
On-Board Memory mode
The G502 gaming mouse supports these pointer customizations in On-Board Memory way:
-
DPI levels - Configure upward to 4 levels, from 200-12000 in 50 DPI increments.
Note: DPI Shift setting isn't bachelor in On-Board Retention style.
-
Study rate - Update from 125/sec (8ms response time) to 500/sec (2ms response fourth dimension).
For details on configuring your gaming mouse in On-Board Memory mode, see respond 360023420373.
Frequently Asked Questions
There are no Downloads for this Version.

Product Specific Telephone Numbers
Principal Phone Numbers
webcontent=productfaq webproduct=c0e6ade9-7db0-11e9-aa7f-39c78a2ed488 webcontentid=c5ee370c-a8f1-11eb-a7c3-d7ef40f2e653

How To Set Dpi On Logitech G502,
Source: https://support.logi.com/hc/en-us/articles/360023420373-Configure-G502-pointer-settings-with-Logitech-Gaming-Software
Posted by: morenoentils1983.blogspot.com
0 Response to "How To Set Dpi On Logitech G502"
Post a Comment